Wednesday 17 April 2019

A11 wide beam video light

This well designed and super powerful LED video light is a real surprise for the price.

The advertising says it's 20,000 lumen! Seems a lot for a mid sized light but it is very bright.

Requires 4 x 18650 button top LiPo batteries.

It produces a very bright unfocussed light with no hot spot. There are 3 power levels, which is great because full power is too bright for close ups, and 4 red LEDs and 4 Blue LEDs.

The red is used for still camera focus assist, without disturbing the marine life, and the blue is for UV fluorescence (maybe).

The coloured LEDs can also be mixed with the main white LEDs for subtle colour balance changes. There is also a red flashing mode which makes a great rescue beacon.

Solid alloy construction with 2 o-rings, and includes 4 spare o-rings, lubricating grease, ball mount and large handle mount with hex wrench.


Review video


For this shallow pier dive I used it wth an SJCAM SJ7 Star action cam in a Telesin 6" dome housing, with an SJ8 Pro for cut away footage.


Banggood Purchase links

Monday 15 April 2019

Telesin 6" dome housing for SJCAM

Using a dome housing can let you capture split level stills and video. It also gives an unmagnified underwater field of view and less colour fringing, unlike flat housings.

This is the Telesin 6" dome housing for SJCAM SJ7 and SJ6 cameras. Banggood product page


Review video


Here are some results from surface snorkelling in the Pt Lonsdale shallows.


Screengrabs from the 4K video


Sunday 17 February 2019

Action cameras underwater

Action Cameras, like the SJCAM SJ8 Pro and SJ7 Star, record superb quality 4K 30fps video. Although they will never replace a large sensor video camera with manual controls, they are very impressive and convenient for underwater use.

Videos from St Leonards Pier showing off the 4K results. 
View in YouTube using Chrome for best 4K experience, Safari does not support 4K video

SJ8 Pro camera at 4K 30fps. 
Colour Balance - Auto (would be better as CLOUDY) 
with colour and contrast adjustments in Final Cut


Testing the Crelant VD90 LED flashlight
 with diffusers and 80A colour correction filter.
 SJ8 Pro main camera, SJ7 Star cut-aways. Both at 4K 30fps
Colour Balance - CLOUDY. Exposure -2/3EV


XiaoMi Mijia and ThiEye T5e 4K cameras at 1080 30fps
Colour Balance - AUTO. Adjusted in Final Cut


Thursday 20 July 2017

Diving again

I have been concentrating on RC planes for quite a while and the diving has taken a back seat. But the urge to get wet always remains.

Here are a few videos using GoPro style action cams, which do an amazing job for the money.
I really like the SJCAM SJ7 and ThiEYE T5e action cams.


Sunday 9 February 2014

Cuttle corner

Cottage Reef is a great shore dive halfway between Queenscliff and Pt Lonsdale. The reef is about 50m off shore with max depth of 8m.

You can reliably find cuttles and schools of old wives here and even sea dragons if you're observant.

This adolescent cuttle was just as interested in me as I was in him.


It's quite photogenic with colourful invertebrate growth under deep kelp covered ledges.

The rocky reef faces north so you can often shoot up into the sun with colourful sponges and gorgonians in the foreground.

Sunday 19 January 2014

St Leonards nudibranchs

I never look for nudibranchs these days. Seems I can't resist putting on the fisheye lens every dive.

But that doesn't mean the nudis aren't there, have a close look at the pink sponge in this shot of a pile.

Two tiny Noumea haliclona slugs snuck into the frame without me knowing. Didn't pick them up till weeks after I uploaded the shot to Flickr.


For such an un-assuming little fishing pier St Leonards provides wonderful photo opportunities, both macro and wide angle. 

Probably the best feature is that it's protected from SW winds, so when the ocean is a churning mess of swells this spot is a calm haven.

Thursday 11 July 2013

RAW vs JPEG demo video

This video shows the difference between RAW and JPEG captures.

Nikon D80 or D7000 set on RAW+JPEG, images viewed in iPhoto.

Good quality screen and internet connection are needed to see the difference.
RAW capture has more shadow detail, less saturation and contrast, and smoother tones in the highlights. Check out the sun ball and the deep under ledge shadow areas.


For evenly lit open scenes and macro JPEG works well giving a pleasing image straight out of the camera. But for scenes with deep shadows, sun balls or large areas of mid-toned background water, RAW is best.

Of course the idea with RAW is that it's just the starting point. Adjustments to exposure, contrast, saturation and sharpness are most likely needed. But you can make these adjustments with less degradation than if you started with the JPEG.

By degradation I mean visible banding in the graduated tones of the background water, and digital noise or speckling in the darker areas.

Thursday 27 June 2013

2 camera solo video drysuit dive

In this video, shot with Nikon D7000 and GoPro HD2, I don a drysuit unaided, show the beach entry at Cottage Reef and meet some of the local marine life.

Shooting with a second camera like a GoPro can add an interesting cutaway viewpoint to the final edit. But some post processing of the auto exposure and white balanced GoPro footage is necessary.


Saturday 1 June 2013

Video via towed diver

This info is mainly for my own future reference.

I have occasionally needed to record video along underwater transects (that's a scientific term for straight lines running across an area of interest). For transects of 100m or so it's OK to swim it (on scuba), but for longer distances I have been towed behind a boat. A scooter would be the best option but not within the budget.

For the video to be useable towing speeds need to be very slow. Firstly so the diver can hang on and have some depth control and secondly so the image is not moving too fast.

In the past a Panasonic Lumix LX3 has given reasonable results, but this time I tried the Nikon D7000. I wasn't using lights so did a Manual WB measurement off the sand, and that worked well. Max depth was only 4m.

Camera setup was Tokina 10-17mm at 17mm to reduce the fisheye distortion, pointing down and slightly angled forward about 1m off the bottom. 1/50th sec Shutter priority -0.3EV and ISO 400.
Here's an example of the footage captured.

Better results would be achieved with a faster shutter speed (so that single frames would be usable), say 1/125th, slower towing speed, 0EV, more distance to the bottom, say 1.5m, and/or angling the camera 45º forward.


It was interesting to see thousands of Elysia viridis? slugs over the entire area we surveyed.


Friday 19 April 2013

Tasselled Anglerfish

Blairgowrie Marina is the best site to find this rare and cryptic fish.

I have dived at Blairgowrie 26 times over the last 6 years and this is the first unaided sighting for me.

The camouflage mimics red algae closely so the only way to spot them is by finding the mouth, eye or lure.

My next challenge is to find one in a more photogenic pose, just have to keep returning.

Wednesday 27 March 2013

Rapid Bay dive trip - Days 2,3,4


The wind eased overnight so it was just a matter of waiting for the water to clear up a bit. We checked the jetty first thing but the swell was still up and vis about 1/2m.
Checked again in the afternoon and conditions had just improved enough to jump in. Swell was still enough to make entry a little tricky with a bulky camera setup but vis had improved to 3m. Lucky we did dive because this would be our only break in the weather for the whole 4 days.

The trip from the dirt carpark to the entry platform is much easier with trolleys. It's shorter than it used to be walking right out to the end of the old pier and could be done without trolleys if you don't have heavy camera gear. We locked the trolleys and camera bag to the pier railings with a bike cable lock, but the fishos seemed friendly enough. It gets very crowded on weekends.

From the entry platform a row of metal stakes lead west straight across to the old pier in about 6m. Another row heads out north west toward the end of the old pier then does a dog-leg back to meet the main pier. The stakes must be about 5m apart, we couldn't see from one to the next.
The area between the two rows of stakes is called Leafy Gardens, there are 5 resident leafies here.

Unfortunately a recent head cold had left me with an unsuspected clogged up frontal sinus. Below 5m I was getting a bad headache above my right eye. This was the first time ever for me, very frustrating. I then spotted 2 leafy sea dragons down at 6m but was unable to get down to photograph them. I flashed Bruce with my strobes and there was much rejoicing, although he wondered why I wasn't down there shooting. I think he interpreted my headache signals as clenched fist type celebrations.

Eventually I managed to get down the extra 1m by going very slowly, or it might have been the adrenaline masking the pain, and started shooting dragons. What an experience, they are the most bizarre and beautiful creatures. They swim very slowly rocking up and down, often swimming in unison with a mate. In fact the rocking motion is how I spotted them initially, and they are slightly brighter yellow than the weed.

We stayed down for over an hour finding one more seadragon, a few big spider crabs and a little cuttle.
While we were down the wind and swell had increased making the exit a little too exciting but nothing could dampen the exhilaration of finding these spectacular and rare seadragons. Leafies are only found in a limited stretch of southern Australia, nowhere else in the world.

We were looking forward to subsequent dives with better conditions but sadly the wind picked up and prevented any more diving over the next 2 days. We could have headed over to Victor Harbour and calmer water but the vis wouldn't have been any better.

Here's a 4 min video of the trip

One issue with diving at Rapid Bay is that there are no dive shops on the Fleurieu Peninsula. The closest dive shop is Southern Diving 70min drive north at Christies Beach. All the closer dive shops have closed down. So we took 3 tanks each and intended to do the 2 1/2 hr round trip for fills after dive 3. Maybe next time.

On our last walk along the jetty we came across an instructor and student from NB Scuba in McLaren Vale. He told us these were the worst conditions he'd seen in 6 months! He also said he has a compressor at home and does fills and is closer than Christies Beach. Good to know.
It was interesting to see the dive instructors wearing shark shields, maybe it's a workplace safety requirement.

More underwater and kite aerial photos here

Thursday 21 March 2013

Rapid Bay dive trip - Day 1

Bruce T and I are in Second Valley, South Australia for a 4 day leafy seadragon photo trip.

Thu 21st March 2013

Got bogged trying to drive out of Randalsea, our holiday rental house at Second Valley. Had to enlist a passing 4WD to tow us out. The drive is very steep, short and dusty. Too steep for a wagon loaded with dive gear.


Wild weather arrived overnight Storm force NW wind, rain, lightning the works.

Diving not possible in 4m swells and it will take a while to clear up. Bad start.

Saturday 9 February 2013

Lumix Coolpix Triggerfish

Whenever we do the yearly Bluescope seagrass monitoring trip to Westernport I take the tweaked Coolpix 5000 housing with the Lumix LX3 fitted. Jan always likes to spice up her report with some photos of the colourful marine life under the wharfs.

It's not worth taking the SLR rig and I think the compact setup is better for the difficult conditions. Currents and terrible vis are the norm.


I have been using the Inon S2000 strobe with fibre optic sync cord but that presents some problems. Because the strobe always copies the camera strobe it always gives 2 flashes. That means you cant use full or half power because the strobe can't recharge in time for the second flash.

Using the Triggerfish slave sensor with a wire sync cord and Inon Z220 means I can use the full range of flash power and have total control. The triggerfish can be programmed to fire on the first or second flash. The Inon's dials are much easier to read and operate too.

I also added a focus torch mount using Locline which matches the one on my SLR housing.

Tuesday 1 January 2013

Dive site aerial photos

Mixing two hobbies, UW photography and Kite Aerial photography, results in aerial photos of dive sites.

On a recent dive to Popes Eye in Jan's boat I decided to sling in the KAP bag just incase the wind was nice. I was a little concerned about disturbing the gannets and kite line tangles. Shouldn't have worried as we were the only boat at the site and the gannets are such good flyers and they tended to come in just skimming the water surface.

I used the Pilot 2m2 parafoil which stuffs into a small bag and the GoPro in its waterproof housing. Wind was just right, light and steady. Next time I'll aim to capture the whole rock circle.


Underwater the blue-throat wrasse were up for some posing and the water was clear enough for some decent shots.


Now my dive site requirements are calm clear water with just enough wind to lift a KAP rig. Unfortunately all subsequent dives have been in perfect diving weather with no wind at all.

Tuesday 13 November 2012

KAP or Kite Aerial Photography

This what you get when you add kites, cameras, radio controls, simple electronics and lots of shed tinkering time.

Capturing images from a kite produces a rarely seen perspective. These low level aerial images are on a more intimate or human scale than traditional aerials from aircraft.

There is a very active world wide online community of KAPers and some seriously clever inventors producing electronics, rig control scripts and mechanical bits for KAP rigs.

Kites
Big stable kites are needed to lift the camera and rig. KAPers usually have a range of kites to cover different wind speeds and camera rig weights. More about that later.

Cameras
The lighter the better obviously. GoPro, Canon compacts and even SLRs are popular and mirrorless large sensor cameras are starting to feature too.

Canon compacts can also be enhanced via CHDK (Canon hackers development kit) and SDM (Stereo Data Makers) firmware changes. I'll write more about these later but basically some very clever programmers have written firmware enhancements which add functions such as intervalometers, RAW, HDR and bracketing.


KAP rigs
There are many different styles of KAP rigs but these are the main divisions.
RC KAP - using full radio controlled rigs with shutter, pan and tilt control.
autoKAP - using modules like AuRiCo (automatic rig control - preprogrammed electronics replacing the radio control receiver)
Manual KAP - where you set the camera orientation before launching

My KAP shots

KAP flickr group

KAP shop - Oh yes, there is one


UPDATE:
This is such a big topic I have started a new blog just for KAP.
Kite Aerial Photography by Andrew Newton

Saturday 11 August 2012

DIY Underwater Tripod

A major problem with underwater video is camera movement. Keeping still enough to prevent your audience getting seasick is not easy and for macro it's impossible.

So here's a basic idea for a tripod. Using my existing 8" strobe arms, clamps and a handle post attached to three Sea and Sea ball adaptors from Mr Leung of ebay again.

Here's a video of the first test in 2m vis and 10c temp. Hurry up summer!


To fit the balls to the handle bolts 2 adapter holes were enlarged to 8mm. Another hole was drilled in the tray to attach the third ball.

Sunday 29 July 2012

Nikon D7000 underwater settings

I have finally put together a page of all my settings with brief explanations.

This is for Nikon D7000, Ikelite, Inon Z220 strobes, macro, wide angle, split levels and video.


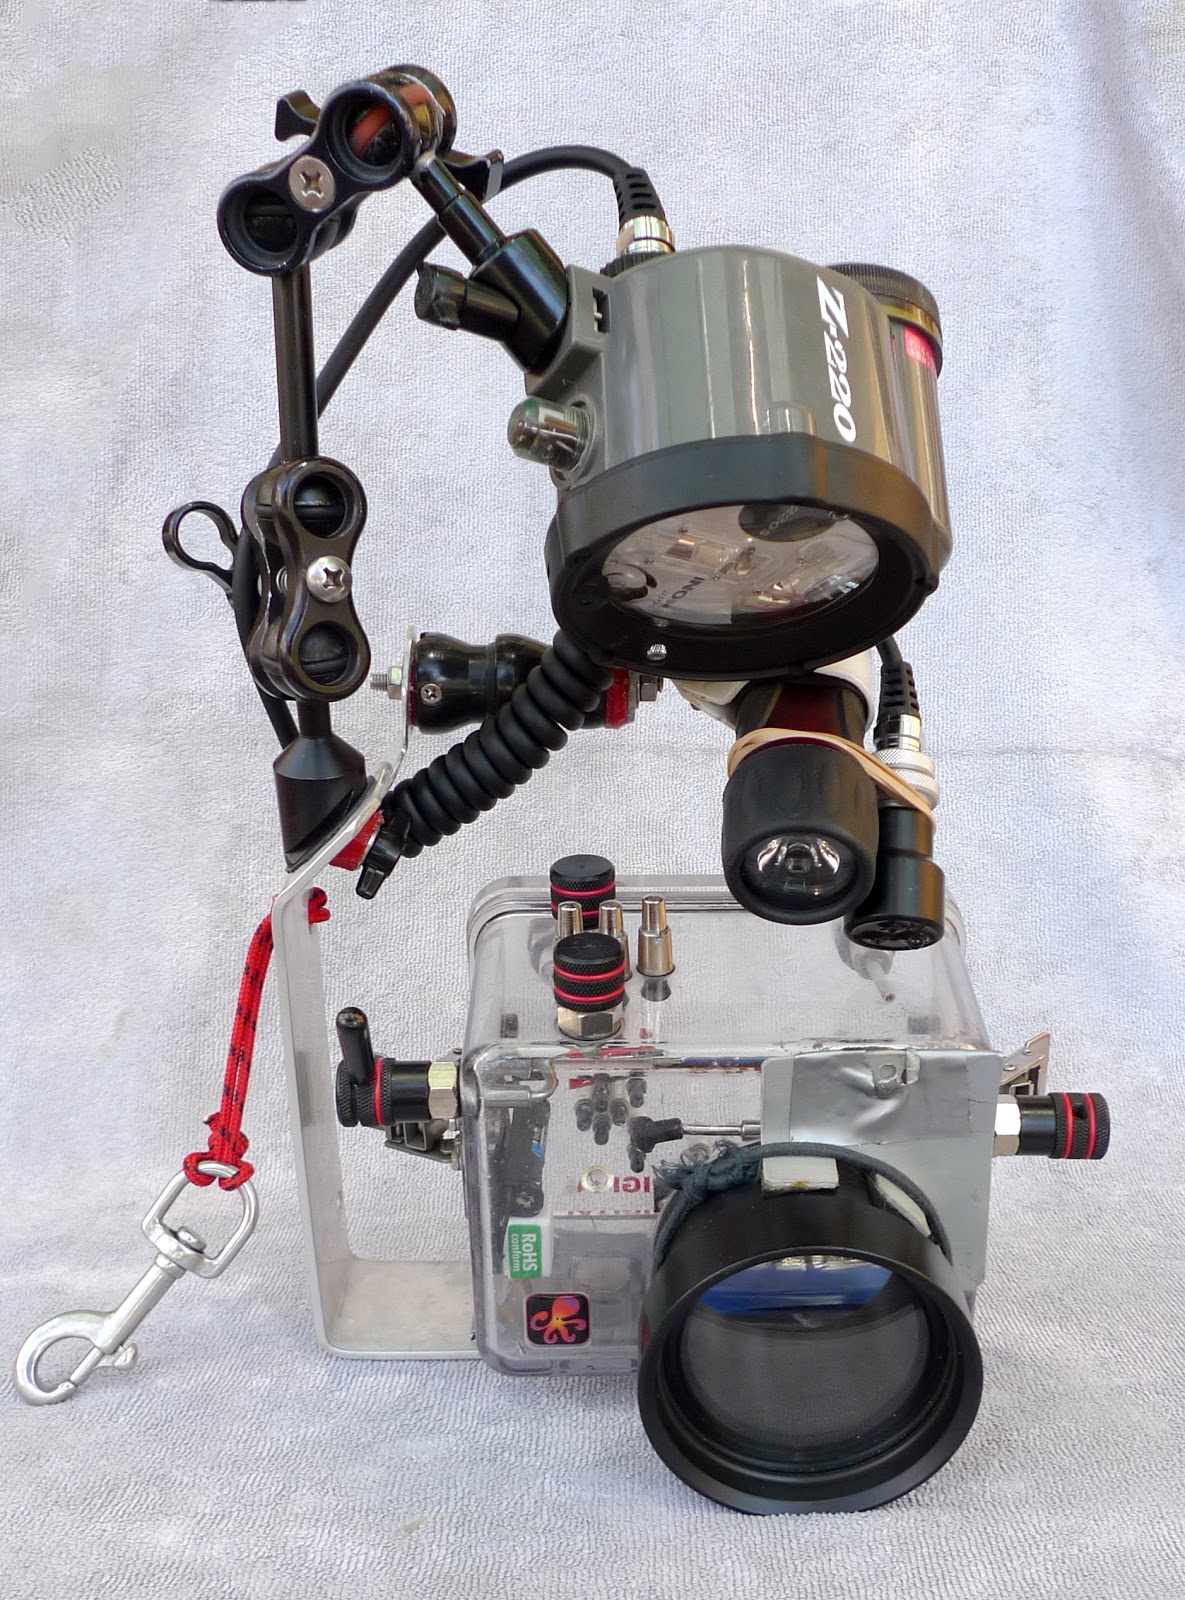
Ikelite housing with Inon Z220 strobes, one triggered by wire sync cord and the other slaved via fibre optic cord. Manual Aperture, Shutter speed and flash power.

Initial setup

Movie Settings - Manual Movie settings
ON (for manual video exposure) or OFF (for auto exposure)
Custom Setting Menu
a8 - Live view/movie AF - Autofocus mode - AF-S (AF-F does not work well enough)
f6 - Menus and Playback OFF (Control dials change A and S rather than image displays when image review is still on)
f7 - Release button to use dial (Activates sticky buttons. Tap and release a button, like ISO or WB, and then make changes with the control dial)
White Balance - 5260K for stills. Auto or manual WB for movie

Macro
Lens - Nikon 60mm f/2.8D AF Micro Nikkor and flat port
Quality - RAW 14bit plus fine jpeg (Often just use the jpegs)
Aperture - f/22 (For max depth of field)
Shutter speed - 1/125th (Fast enough to avoid camera shake in ambient light areas)
ISO - 100 (Plenty of light available from close strobes so use lowest ISO)
Flash Power - Adjust as needed (Usually around -3.0)
Focus - AF-S with Single or Auto 39 AF points (I often pre-focus on something then hold down the AF lock lever then recompose with the most important feature in focus)
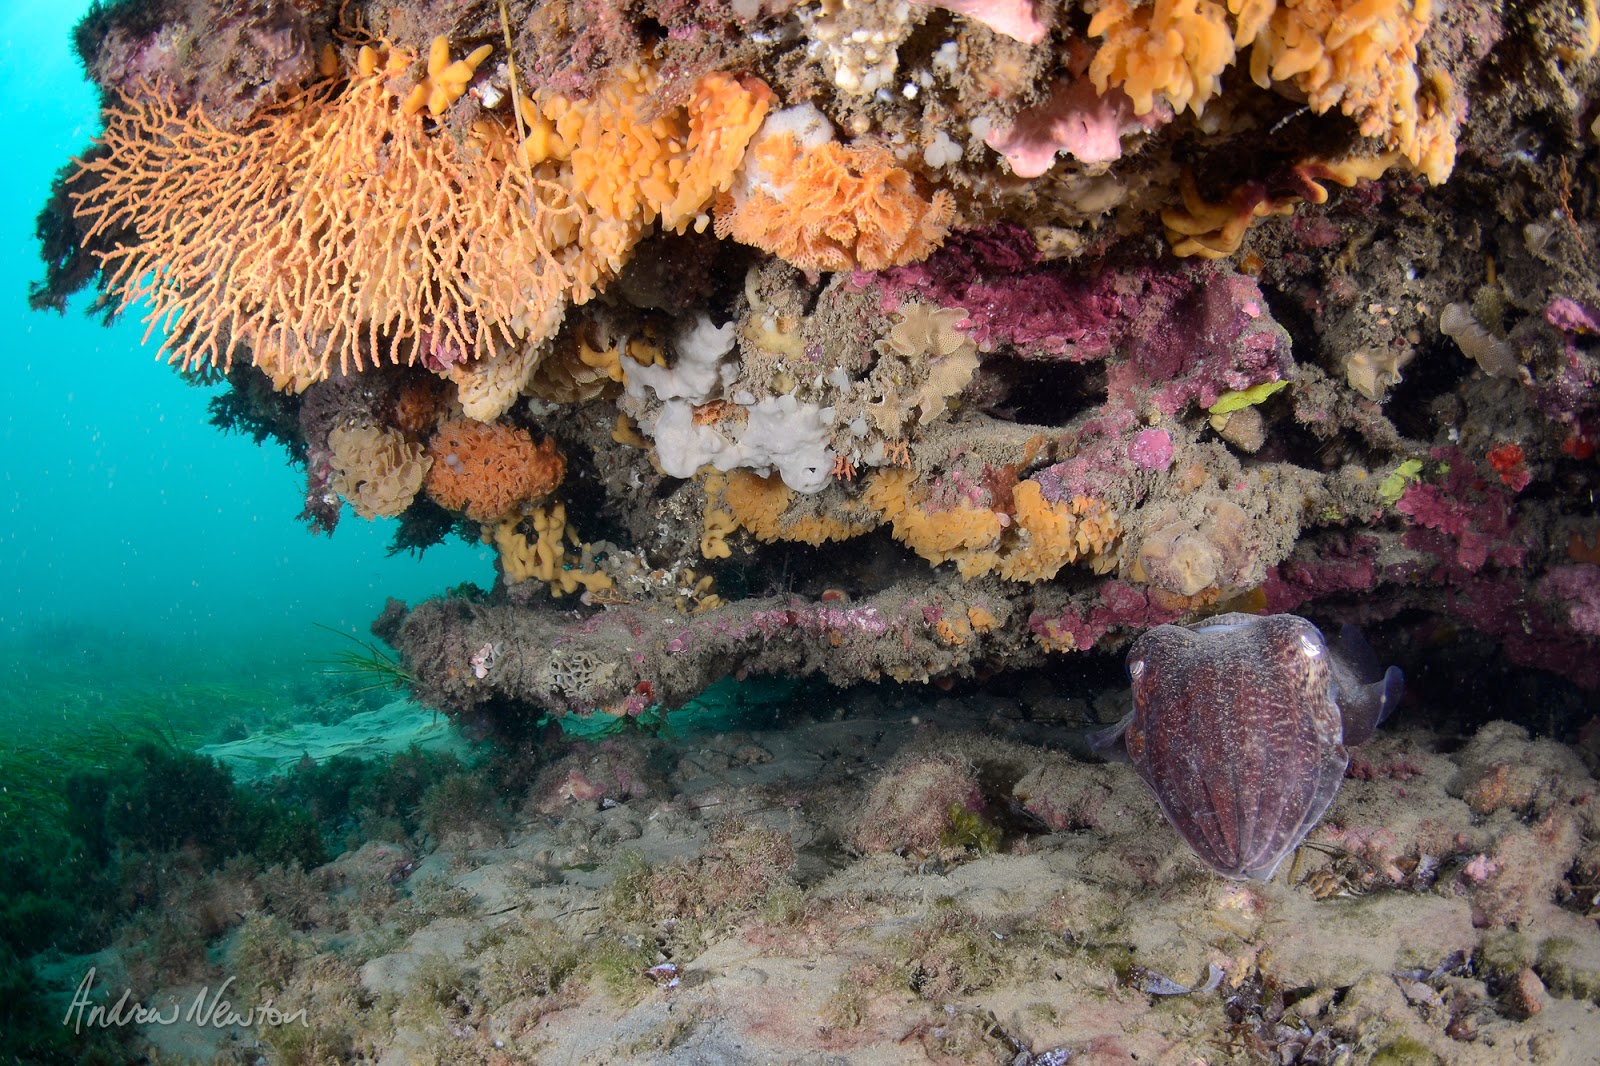
MACRO photo gallery

Wide angle

Lens - Tokina 10-17mm DX fisheye with 6" dome port and cut away shade
Quality - RAW 14bit plus fine jpeg (RAW much more useful for wide angle. Captures smoother tonal gradation in background water and sunballs. Also allows colour cast adjustment without loss of tonal smoothness)
Aperture - f/8 (Depth of field is not a problem, especially with fisheye lenses)
Shutter speed - 1/60th then adjust to balance ambient exposure with flash
(Shooting towards the sun will need faster shutter speed and smaller aperture)
ISO - 200 (Or higher for deep ambient light shots)
Flash Power - Adjust as needed
Focus - AF-S with Auto 39 AF points
WIDE ANGLE photo gallery

Split level

Lens - Tokina 10-17mm fisheye with 8" dome port. (The extreme wide angle of view and larger dome port are essential for sharp split levels. Need to spit on the dome and rub around to reduce drips in the top half. Dip under water then shoot as you lift up out of the water)
Quality - RAW 14bit (Allows exposure adjustments in Photoshop without reducing the image quality too much, especially the underwater half)
Aperture - f/16 (Need the depth of field to keep above and below sharp)
Shutter speed - 1/125th (or faster to freeze water movement and avoid overexposing the brighter above water areas, like clouds)
ISO - 400 (To allow f/16 and faster shutter speed)
Focus - AF-S with Auto 39 AF points. (Pre-focus on the underwater subject then hold the AF lock lever)
SPLIT LEVEL photo gallery

Video - Wide angle
Lens - Tokina 10-17mm fisheye with 6" dome port and cut away shade
Quality - 1080 24fps high quality
Aperture - f/5.6 (Have to exit live view to change aperture)
Shutter speed - 1/50th (or as close to 2 times the frame rate as possible)
ISO - Adjust as needed (This is your main exposure control for video)
Light - Diffused UK Light Cannon HID torch. (Proper lights would be better)
Focus - AF-S with Auto 39 AF points.
(Prefocus for each scene. Continuous AF (AF-F) is too slow and lens focus noise is intrusive)
VIDEO gallery

Video - Macro
Best done on a tripod to avoid camera movement.
Lens - Nikon 60mm f/2.8D AF Micro Nikkor and flat port
Quality - 1080 24fps high quality
Aperture - f/22 for greater depth of field
Shutter speed - 1/50th (or as close to 2 times the frame rate as possible)
ISO - Adjust as needed
Light - Diffused UK Light Cannon HID torch. (Proper lights would be better)
Focus - AF-S with single point. Prefocus carefully for each scene.


Saturday 14 July 2012

3 inch strobe arms

It has recently dawned on me that my strobe arms are way longer than needed, and I have always thought the Ikelite handle posts were too high. It has always been more of a problem getting the strobes in close enough to light close subjects rather than out wide enough.

So with the help of Mr Leung from ebay here is the new strobe arm setup (lower image). Strobe positioning, shooting in tight spaces, carrying, fitting in the wash tub and storage cupboard are all now much easier.

Handle posts are 30mm and anodised red (previously 90mm), arm sections are 3" (previously 8") Apologies for the mixed measurement units.

Here's a shot from the first test dive showing that even with a 10mm fisheye and heaps of muck in the water the strobes could be positioned effectively.

Friday 6 July 2012

Macro lens mount in use

Next week has arrived and the weather is calm and the water is chilly and clear.

Here's a video of the lens holder being used on a St Leonards Pier photo dive.

Thursday 28 June 2012

Macro lens mount for Ikelite flat port

You can buy a MacroMate for US$599 or you can bodge one together using your own macro lens and plumbing bits.

This creation holds an Inon UCL165mm M67 on an Ikelite macro port. The lens can hinge up out of the way for normal macro.

Bad weather is preventing a field test. Maybe next week.


Tuesday 15 May 2012

Nikon D7000 in Ikelite D80 housing revisited

Here's a video showing how the Nikon D7000 fits in an Ike D80 housing.

Sunday 13 May 2012

Shimano Hub Dynamo repair DH-2R35-E

The 2 new black-rimmed front wheels for our Azor Dutch bikes arrived with smashed electrical contacts. Both wheels damaged in exactly the same way.

Rather than go through the hassle and delays of sending them back we decided to repair them. It turned out to be very easy. The new internal assemblies were bought online from bicikli.de in Germany and arrived within 2 weeks.

The info and tech diagrams on the Shimano website gave me the confidence to give it a go.

Here's the video explaining how it's done

Thursday 26 April 2012

GoPro panning time-lapse kitchen timer

GoPro cameras have an excellent built-in time lapse mode.

Ordning kitchen timers ($14.99) from Ikea have a flat top which is perfect for sitting a GoPro camera on.

Put the two together and you have a very cheap and simple panning time-lapse rig.

For a sturdier platform I stuck one of the supplied GoPro sticky clip mounts on the top of the timer and moulded some PVC plastic into a cup shaped tripod mount for the bottom of the timer.

The timer gives me 360º rotation in 60min (obviously) and an alarm to tell me when it's cooked....I mean finished rotating.


These clips were taken at 1 frame every 2 seconds for 15min (pan of 45º) producing 450 frames. The video was encoded using Timelapse Compiler (Donation ware Mac only) at 25fps resulting in 18sec clips

Friday 20 April 2012

DIY macro lens mount and strobe arm

Just for fun I thought I'd make a macro lens mount for my Lumix LX3 in Coolpix housing rig.

Here's what I came up with to hold the Inon UCL-165 M67 onto the dome port.

The 90x75 PVC pipe connector was close to a perfect fit. I stuck some neoprene tabs in the 90mm end to make it a tight fit over the dome port.

I slipped a ring of PVC in the 75mm end to stop the lens pushing all the way through and bolted on small brackets to hold it in place.

For higher magnification it would be better to use a flat port but this macro lens mount means I can do macro and wide on the same dive. A stronger or stacked macro lens would be better because the closest focus on long zoom only came down to 20cm.

I also wanted to reduce the overall size of the setup so replaced the double Ikelite handles with this simple aluminium tray/arm made from 50mm aluminium flat.


Monday 19 March 2012

GoPro HD Hero 2

These tiny wearable HD video/still cameras are brilliant and reasonable cheap. Mine was $358  with free delivery from WetRez in Cairns.

It can record 1080 170º video, 11Mpx stills and time-lapse at a selection of frame rates with a fixed focus fisheye lens. It comes supplied with various mounts and a waterproof housing.

As is the GoPro can't focus underwater but a variety of add on lenses and tweaked housing are available for around $120.

Being tiny and light the GoPro can be attached to helmets, wrist and chest straps, kites, RC models...just about anywhere you can imagine.

Here are a couple of my early videos.


The sealed housing seems to fog up in the sun quite easily. Dessicant tissue pads are available to prevent this.

Saturday 10 December 2011

Melbourne Downunder Book

Over the last 18 months I have occasionally been hired by Sheree Marris to shoot for her book Melbourne Downunder.

Its a wonderful square format coffee-table book focusing on marine life in and around Port Phillip. Available for $40ish at Melbourne Downunder.

She also bought quite a few shots from my collection for the project, including this one of schooling mullet at St Leonards.
Also the seadragon and seal shots featured on her websites.

Thursday 10 November 2011

D7000 camera in D80 housing

OK I was wrong about the D7000 not fitting in the D80 housing. It actually does fit. Must have not cleared one of the controls at my first attempt.

Front and rear control dials, +/- EV, On/Off and focus lock work but there is no access to video switch. Some of the buttons to the left of the screen would be useable with a small reshaping of the rubber push button ends.

It's a tight fit with the camera pushing hard against something at the front so I would strongly advise a test in fresh water before jumping into the sea.

Saturday 25 June 2011

Ozone Paddle Steamer split level

Just 50m offshore from the Indented Head caravan park and in 3m, lies the paddle steamer Ozone.

It's a great spot for a snorkel or shallow dive and a great spot for split level photos. Some days the vis is even better than this.


The Ozone was sunk in 1925 as a breakwater for the little beach nearby.

Sunday 29 May 2011

Triggerfish remote strobe sensor

Continuing on with remote strobe testing.

Triggerfish is a wonderful little slave trigger made by Hedwig Dieraert. Here's a review on Wetpixel

To test how sensitive it is underwater I toddled off to St Leonards for a dip.

Vis was maybe 6m and Triggerfish worked perfectly 10m away where I couldn't even see the strobe anymore.

Just need to design some method of positioning the sensor like a spike, clamp or mini tripod.

Tuesday 24 May 2011

Gregarious Giant cuttles

Winter in southern Aus is giant cuttle mating season. These normally secretive relatives of squid and octopus become all outgoing and inquisitive.

They will often follow divers around and even occasionally come in for a hand shake, like in this video.

I was shooting stills at the time then quickly switched to video when the cuttle showed interest. With a bit more time i would have done a manual white balance and used -1.0 ev in Aperture priority for better colour and exposure.